Showing posts with label diy. Show all posts

Friday, May 4, 2012

Pretty in Pink Wedding! {Reminiscing}


Before we began Lambs & Kings, we coordinated wedding events for lovely couples with lovely weddings. Last year, we had the pleasure of coordinating a drop dead gorgeous wedding in Aptos, Ca at the the Pacific Estate and Vineyard. It was a  cute country chic estate that had a small vineyard and a large lawn and patio that overlooked the Santa Cruz mountain scenery. It was a perfect setting for vintage inspired chic wedding which is exactly what our clients were dreaming of. My bride is super creative and dreamt up the whole event and knew exactly what she wanted from the shades of pink, to the collected vintage glass, vintage typewriter guestbook, and tons of crafty projects! Everything was meticulously thought out.

We were so giddy to find out that this wedding was featured on Style Me Pretty yesterday!! Its not a surprise as the event was so beautiful and photog Stephan Pappas did a superb job capturing it and Nicole Ha created a beautiful feel with her stunning florals. The entire team was great. Head on over to Style me Pretty to see the FULL post and all the glorious images.


{all image credits to Stephan Pappas} 

This is just a small peek. Give them some love on the SMP site! Seeing these images reminds me how much fun we had doing weddings and working with all our awesome clients and vendors...seriously, all of them are awesome. We definitely do miss it. However, since we are super busy with the business re branding process, and the possibility of going back to school and/or starting a family, we had to put it on hold this year. We are planning to start styling events and doing prop design soon with the focus more on intimate events such as smaller/intimate weddings (such as this one), parties and showers and photo shoots. Stay tuned!

Do you have a wonderful eye catching wedding that you want to share?! Let us know!

xoxo
Annaliese

Wednesday, May 2, 2012

Terrarium Update


As promised, we built our little terrarium this past weekend. The hubs and I have wanted to add some greenery to our home and given that the both of us do not a have a particularly green thumb, making a cute lovely terrarium was a great solution. Above is my first succulent terrarium... I'm super smitten over it! It now lives on one of our side tables in the living room next to a nice little window. I followed the diy from Birdhouse, which I mentioned last week. We used the open face terrarium bowl we bought from west elm because it had nice space to put different plants and it was easy to use with it's wide open face. I figure, its my first one so I need to make this as simple as possible.

I collected all my materials which included a glass container, pebbles, active charcoal (can get at a pet store. Its used in aquariums), succulent soil and an assortment of succulent plants.

It was pretty easy to make. First you put a layer of pebbles in, then mix in some active charcoal, put your soil on top of that mixture and then place your plants as you please...and voila!!


The total project cost me about $40 but I have all material to make up to 3 more terrariums ( i bought too many succulents and the bag of soil and carton of charcoal gives you a ton) so after I make those 3 it will come out to be about $10 a terrarium. This is definitely a budget friendly project that makes a lovely gift for someone or if you are just looking for a low maintenance way to add some lovely green to your home.

Hope you enjoyed our little project.

xoxo
Annaliese

Wednesday, April 25, 2012

Get your hands Dirty: Terrarium

succulent terrarium

This weekend, I am planning on getting my hands a little dirty and doing some planting and gardening. On my to do list is finally making a succulent terrarium for the house. I'm trying to spruce up my green thumb and I'm thinking this low maintenance project will be the right start. I've scoured the Internet researching instruction, care tips, and creative ideas for a terrarium. Succulents have a such a special place in my heart and they always look so cute and lovely so I have decided to use succulents over other plants such as tillandsia (air plants). You can choose to do any kind of terrarium and from all the research I've done, it seems like the same type of materials are needed. Check them out below
what you need terrarium
Make the Terrarium your own by choosing a unique container. There are tons of options. I personally love cloches and West elm's wide selection of terrarium glassware.

As for the "How To", here is the diy that I am following from Birdhouse Diy + Design. I chose one that was simple and straightforward. Be sure to read the care and watering instructions. Very helpful! Feel free to share ones that have been successful for you. 

terrarium containers


Good luck! and Happy Planting!

UPDATE!! See our Finished terrarium from this weekend HERE

xoxo
Annaliese


{All boards created by me}

Tuesday, February 8, 2011

d.i.y: T-shirt pom-poms!!


Cute right? Want to learn how to make these pom-poms?
They are perfect for wedding decor, showers...or perhaps a valentine's party?

Here is what you need to make these...


Thats right...your old t-shirts!! Pick the ones you dont need anymore, and ones that are in the colors you love (or you can dye them).

Other materials needed:
  • t-shirts, 1 per pom pom
  • scissors
  • cardboard


This wonderful Diy was found on craftaholics...so its only fitting that you head over to their site to see full instructions for making these cuties!!
Want to make these? Find the directions HERE!

Tuesday, January 11, 2011

Dress the Chair: Flower Garland


{Project wedding diy}

This gorgeous little garland is packed with "wow" power and will add a nice touch of elegant drama to your standard wedding chair. A perfect way to make the bride and groom stand out...just a little more.

Here is the easy-peasy how to:

Flowers that work well for this project:
Asters (pictured),
Chrysanthemums,
Roses or rose petals,
Carnations,
Marigolds

You will need:
About 10 -15 stems of fully opened flower blossoms (for a standard Chivari chair),
Fishline,
A Needle,
Scissors,
A spray bottle with water,
Ziplock bag,
Ribbon (around 2 yards)


1. Clip the stems off all the flowers so they can sit flat. Measure the width of your chair and times it by 2. For the standard Chivari chair that we used, we made about a 12" garland

2. Cut a length of fishline to match your measurement. Thread a needle through the fishline and tie a knot at the end of it. Push the needle through the bottom of the flower and repeat. String together all the flowers until the garland is full.


Tip: Mist the garland with water and keep in the fridge overnight in a ziplock bag.

Tuesday, January 4, 2011

d.i.y: Pie in a Jar


{all photo credits to green wedding shoes}

We found this awesome DIY great for favors, giveaways, or just to do...b/c its soo cool!! Thanks Green Wedding Shoes for sharing this great DIY.

Ingredients:Pie Crust Dough (fave recipe or pre-made)2 12 oz. cans of cherry, apple or your favorite pie filling2 Tb of sugar1 large egg beaten

Supplies:6 4 oz. mason jars, cleaned with lids and labels removedHeart shaped cookie cutter1 Cookie sheet


Directions:Preheat oven to 325 degrees. Press the unrolled dough bit by bit into the jars a bit at a time (not too thick!) until the jars are lined with the dough up to the rims. Reserve some dough for toppers. Next, fill jars nearly to the top with filling of choice.


Roll out reserved dough to roughly 1/8 inch thick and cut out 6-8 hearts. Place the filled jars on a sturdy cookie sheet and place into oven.


Bake at 325 degrees for roughly 30-35 minutes or until dough becomes a light golden color.
At that time, arrange the dough hearts on the pies, brush the hearts with the egg wash and sprinkle with sugar. Bake an additional 10-15 minutes until dough is golden brown all the way around the jars. If needed, place foil over the tops of the jars to keep the hearts from burning.
Remove and let jars cool on a rack. Decorate with ribbon, tags, or labels on lids as desired and give to your family, friends or wedding guests!


Tuesday, December 28, 2010

What we love: Little Details

1. Felt flowers


I love all the new alternative Bouquet Ideas I have been seeing. The last post was on vintage brooch bouquets but here are some made out of felt flowers...they are so adorable. YOu can also choose to wear a collection of these in your hair.....did i mention this is a DIY project? check out the "how to" on the Brides Cafe Blog


2. Wicker
{The bride's cafe}
These photos were part of a collection of photos from a wedding in Costa Rica. The wicker adds great texture to the setting and the decor of the event. It totally pulls together the beachy-ness of the style but its so versatile that you can play with it to make it match other themes and styles.

3. Lace Doilies

{Ruffled}
Especially when they are made into these cute little envelopes. Yet again, another DIY project. Check out the how to...here

4. Wooden Words
Not just any wooden words...these ones called "nuzzles". I love the style and typography as well as how the letters are split into pieces and they link together like a puzzle.
From the Nuzzles website:
"Nuzzles™ are custom designed wooden typographic puzzles handcrafted by John Christenson since 2008, each with its own unique characteristics. Every Nuzzle is crafted from a single block of wood, and the characters interlock with each other in a way that creates a sense of harmony and integrity"

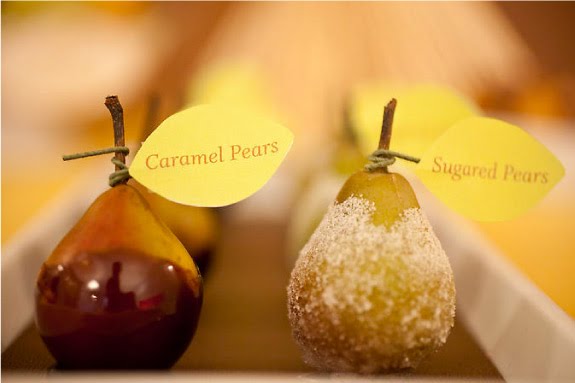
5. Pears

{style me pretty}
A different take on the "candied" apple. such lovely presentation as well.

6. Caligraphy flags
{Southern weddings Magazine}
I know, such a random and precise detail. but I seriously love these little suckers. They are so dainty and cute...adding a little playful-ness yet the calligraphy keeps it classy. Not to mention they make great markers or ways to label items as well as place holders. Instead of personalized napkins with your name and date, you can have straws such as these with flags, so they can go into every one's drink.

Wednesday, September 8, 2010

Flower alternatives: Flores del sol


stumbled upon this beautiful blog flores del sol...ugh so lovely! and very inspiration worthy. Check out her creations using dried moss and plants. It is such a different look. Apparently she has an etsy shop but it is on hiatus for while. I think these would make good alternatives to centerpieces and they will definitely be total eye catchers!!


She has other lovely inspirations using succulents and other materials like feathers, reeds, etc. My Favs are the yellow pom pom reeds.

Monday, June 21, 2010

Trend: Chalk it up


{aylee bits, credit crunch bride}

Chalkboards are making its break into the wedding scene, adding a touch of nostalgia in all the right places. They can match just about any theme. Above youcan see how they are being creatively used: from place cards, to table numbers, to favors, to photbooth signs. They are everywhere. You can also make a lot of diy projects incorporating chalkboards. You can buy chalkboard paint at your local hardware store and used it to make a chalkboard surface out of just about anything.
We are using a vintage framed chalkboard for our wedding as photobooth signage for people to hold up. Are you incorporating chalkboards into your wedding? if so how?

Monday, June 14, 2010

DIY Favors: Ice cream in jar!!


I just had to share this favor idea with everyone. I am a big...a HUGE...ice cream lover so when I saw this diy favor idea...I went nuts. This is a great idea for all the summer weddings out there and very unique. As a guest I would love to take one of these home and try this little treat...Do you remember doing this in your science camps when you were kids?!

I didn't show all the step by step pictures because I am hoping you trot over to Style me pretty to take a look at the article. But here are the instructions.

Thanks to style me pretty for sharing this City Cradle Design.

Materials:
Printer
Glass mason Jar
Ribbon
Small zip-lock plastic bags
half & half individual packets
Rock salt
sugar & vanilla powder

**The guest will only have to add ice!**
Instructions:
1) print out the labels for your jars, cutout and personalize the side label to say what you would like to your guests
2) Pour 1 cup rock salt into the bottom of each jar
3) Pour 1 tablespoon sugar & 1 teaspoon vanilla powder into a small (quart size) zip-lock bag and seal
4) combine the bag of powder and 8 of the half and half packets in each jar
5) tie on your front label with twine
6) tie on your side labels with ribbon for your guests
Related Posts Plugin for WordPress, Blogger...