Showing posts with label Favors. Show all posts

Tuesday, January 4, 2011

d.i.y: Pie in a Jar


{all photo credits to green wedding shoes}

We found this awesome DIY great for favors, giveaways, or just to do...b/c its soo cool!! Thanks Green Wedding Shoes for sharing this great DIY.

Ingredients:Pie Crust Dough (fave recipe or pre-made)2 12 oz. cans of cherry, apple or your favorite pie filling2 Tb of sugar1 large egg beaten

Supplies:6 4 oz. mason jars, cleaned with lids and labels removedHeart shaped cookie cutter1 Cookie sheet


Directions:Preheat oven to 325 degrees. Press the unrolled dough bit by bit into the jars a bit at a time (not too thick!) until the jars are lined with the dough up to the rims. Reserve some dough for toppers. Next, fill jars nearly to the top with filling of choice.


Roll out reserved dough to roughly 1/8 inch thick and cut out 6-8 hearts. Place the filled jars on a sturdy cookie sheet and place into oven.


Bake at 325 degrees for roughly 30-35 minutes or until dough becomes a light golden color.
At that time, arrange the dough hearts on the pies, brush the hearts with the egg wash and sprinkle with sugar. Bake an additional 10-15 minutes until dough is golden brown all the way around the jars. If needed, place foil over the tops of the jars to keep the hearts from burning.
Remove and let jars cool on a rack. Decorate with ribbon, tags, or labels on lids as desired and give to your family, friends or wedding guests!


Friday, November 12, 2010

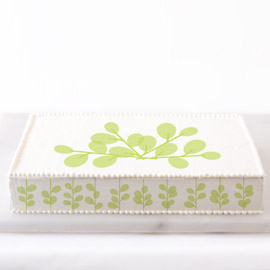
Cute Find: Ticings Cake decor


Planning for an upcoming party soon and stumbled upon this company called "ticings" which makes "edible icing appliqués" to spruce up your cakes or cupcakes. Their designs would definitely bring a fun flare to diy cupcakes for a wedding or any party!!

What are "Ticings"?
"ticings™ are thin sheets of edible icing printed with contemporary designs using food-grade inks.made in the u.s.a., gluten-free, FDA approved and kosher certified, ticings are best applied to fresh buttercreamfrosting. just peel and pressto give your cakes and frosteddesserts modern decorations in minutes!"

They have a few different types of designs for kids, parties, weddings...but you can design your own to match anything. I am thinking of using this for the cupcakes we are planning on making for my Grandma's surprise shindig (a big reason I've been away from the blog world for a while when you combine that with weddings and consults).

Anyways, here are some really cute design and ideas from their page as well as a simple how to.


"it’s as simple as one, two, three."
1. frost. prepare your baked surface with a soft frosting (buttercream works best, but any soft frosting will work). make sure the finished surface is smooth and flat.
2. peel. with dry hands, gently peel ticings from the backing sheet and center on top of the frosted surface.
3. press. gently pat into place, smoothing the edges to remove any air bubbles or unevenness from the frosting underneath. add sprinkles, sanding sugar or frosting decorations around the edges to finish, or use alone for a quick and elegant decoration.

If you guys end up using them, share some pictures with me and I'll do the same =)

Happy Weekend everyone!!


Monday, June 14, 2010

DIY Favors: Ice cream in jar!!


I just had to share this favor idea with everyone. I am a big...a HUGE...ice cream lover so when I saw this diy favor idea...I went nuts. This is a great idea for all the summer weddings out there and very unique. As a guest I would love to take one of these home and try this little treat...Do you remember doing this in your science camps when you were kids?!

I didn't show all the step by step pictures because I am hoping you trot over to Style me pretty to take a look at the article. But here are the instructions.

Thanks to style me pretty for sharing this City Cradle Design.

Materials:
Printer
Glass mason Jar
Ribbon
Small zip-lock plastic bags
half & half individual packets
Rock salt
sugar & vanilla powder

**The guest will only have to add ice!**
Instructions:
1) print out the labels for your jars, cutout and personalize the side label to say what you would like to your guests
2) Pour 1 cup rock salt into the bottom of each jar
3) Pour 1 tablespoon sugar & 1 teaspoon vanilla powder into a small (quart size) zip-lock bag and seal
4) combine the bag of powder and 8 of the half and half packets in each jar
5) tie on your front label with twine
6) tie on your side labels with ribbon for your guests
Related Posts Plugin for WordPress, Blogger...